
“There are numerous ways to process venison, but one method that’s a hit with just about everyone—kids and supposed venison-haters included—are deer sticks. Of course, every self-processing hunter, meat locker, and game processor has their own favorite recipes… Here’s one that I produce in my own kitchen that’s easy, minimizes mess, and yields tasty results.” -Aaron Ambur
Recommended Equipment/Ingredients
- A good, sharp knife
- Clean hands, equipment, and surfaces
- Some kind of meat grinder/stuffer (I use a Cabela’s ¾ HP grinder)
- Optional mixer
- A smoker (or oven)
- Snack stick casings
- 5-gallon ZipLok bags
- Vacuum sealer & bags
- Meat bucket/plastic bin
- Venison (I grind hind quarters)
- Pork (I grind pork shoulder)
- Seasonings (I like Hi Mountain Cracked Pepper ‘N Garlic)
- Cheese (cheddar or pepper jack work best for me)
First of all, I don’t use 100% venison. I start with 70% venison from deer hind quarters, trim it, and grind it. To that, I grind up pork shoulder to make up the other 30% starting meat mixture. Then I mix it all up to fully distribute the venison and pork. While there are hand grinders and add-ons to kitchen mixers, I’ve been using a commercial-grade Cabela’s ¾ HP grinder for years. If you process a lot of meat, you might want to consider a dedicated grinder/stuffer combo like this one.
As far as seasonings, I keep coming back to Hi Mountain Cracked Pepper ‘N Garlic, which is just my day-in, day-out favorite. I add whatever amount is recommended on the package for about two and a half cups of added water to the entire meat mixture.
Next comes the cheese—usually a couple pounds of small-cubed cheddar cheese or pepper jack cheese. I always like to keep a little variety in my sticks when I make them to make it a little more fun.
While you can use a mixer, I make sure my hands are clean and do all the mixing manually. This gives me a better idea of whether I should add additional water or not. Generally speaking, it’s two and half cups of water for 10 pound of mixed meat and Hi Mountain Seasoning, but you may find you need just a little bit more water.
What follows next is pushing the meat through the grinder/stuffer into my snack stick casings, which is a step where it’s nice to have another set of hands as the meat-filled casings will start curling up in the container you place on the floor—typically a bucket or plastic bin of some kind.
Once all the meat has been cased, I place them in a 2.5-gallon ZipLok bag and refrigerate overnight.
Smoking Your Deer Sticks
Although I’ve used a lot of different styles of smokers over the years, I’ve taken to using a Traeger recently for its simplicity. As far as pellets go, I almost always use hickory, but go with what you like. I then set the smoker to 180 degrees, close the lid until it reaches temperature; then, once up to heat, place the meat inside for two hours, flipping the meat-filled casings top to bottom once during the process—typically at the one-hour mark.
As far as optimal meat temperature, use a temperature gauge to poke the meat close to the two-hour mark, looking for that needle to hit the 160-degree mark. Once the meat hits 160 degrees, I’ll take the meat off, and I place on a cool, granite, kitchen countertop to cool. I’ve taken to using a Bluetooth thermometer I can keep in the meat and monitor from my phone while doing other stuff around the yard or in the shop.
The Finishing Process
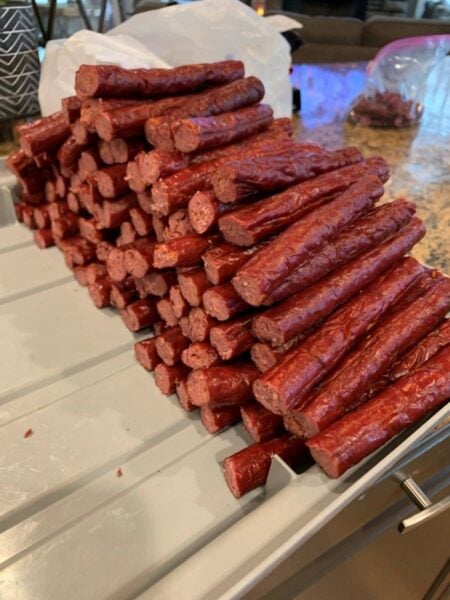
Lastly, you’ve got what I call the “finishing process”, which means cutting the meat-filled casings at the bends—and into sticks—and then vacuum-sealing it all into bags. You find the bends, cut the ends off, and package. Easy. How many you package per bag is entirely up to you.
What If I Don’t Have A Smoker?
Not everyone has a smoker. The good news is, you can use an oven. Surprisingly, you can make pretty good venison snack sticks entirely in the kitchen. Do you get the smoke? No, but you can add a little Liquid Smoke to the meat mixture if you want.
If you can’t set your oven to below 200-degrees, set it to 200 and crack the door just a bit—maybe even wedge it open with a wooden spoon or something. Again, you want to bring the meat up to 160 degrees, which takes about two hours.
Words of Advice
The worst thing about processing deer sticks is cleaning up the grinder/stuffer, so what I’ll generally do is mix up several five pound bags of ground venison and pork meat mixture and not stuff it all at once. I may only do one bag at a time. And I don’t season what I may process another day. So, I put the extra bags of meat mixture in the freezer for the future when we run out for snack sticks! When I think we’re ready for another batch, I simply thaw a bag of thepre-ground meat mixture in the refrigerator 24- to 48-hours before I plan to smoke and package another batch of sticks.
All that said, I generally grind all my venison at once for a season of making batches of sticks at different times. It might get to June and all I have to do is thaw out a bag of pre-mix, put it in a bowl, mix in seasoning, stuff it, and smoke it. Works great!